


As promised, I set out to remake my fence painting for tutorial sake.
These are the steps I used to create the fence in Add's room.
*NOTE-I use acrylic paint for this tutorial. You will want to use wall paint for your walls.

Since I don't have another wall that needs fencing ;) I just recreated on paper.

First, you will need something to trace to give you a guide as you paint. Here I used a box of flavored water ;) I used an old 1x6 to do Add's room.
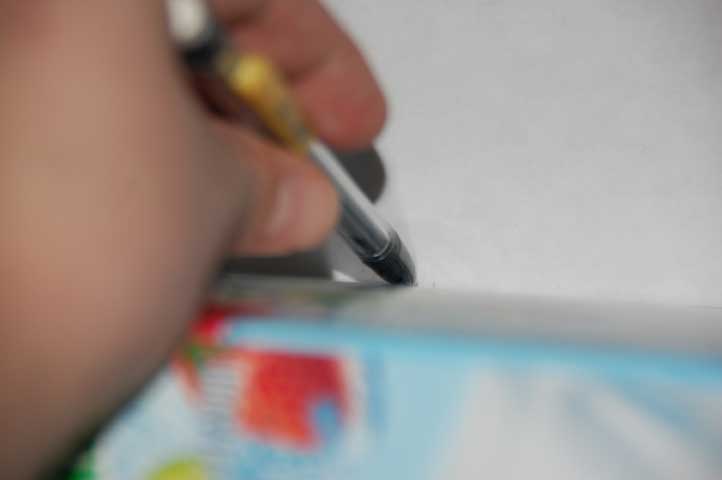
I traced my guide with a pencil.
Total Side Note: I loathe mechanical pencils. But, Puddie loves them... hearts them even. I couldn't find a single pencil around here, but found a whole box of mechanicals...so that is what I had to use. Just had to clarify that point.

If you squint real close here, you can see my lines where I have made a fence by tracing the box. These lines will simply serve as a guide to keep things somewhat proportional. I, however, heart coloring outside of the lines ;) Just sayin'

Then I grabbed two different colors of brown paint and two pathetic looking paintbrushes... let's call them well loved.

Now take the lighter paint and a curious two year old and paint in your "logs"

Notice: The logs aren't perfectly straight like the lines were. This is important. Don't be going all type A perfectionist on this one little project :)
Now you wait for it to dry. Once it is dry, it is time to get knotty ;)

Add your knots by painting ovals in the darker color. I look to place mine where the paint naturally curves out. However, you can place them just about anywhere.

Now add more texture by stroking the darker paint randomly along each log. The key here is to make sure you have a little amount of paint on your brush, not a lot.

Above would be an example of almost too much paint ;)

Enter magic tool.
Sharpie how I love the.
Now if you are a stickler for using paint on a wall, you can use a paint pen I suppose. But, I have to tell you-- my inner child LOVED marking up the walls with a marker.
The key to using Sharpie to define your painting is to remember NO SOLID LINES. Just make medium strokes with the pen.

Go over the outline of the logs several times with broken lines. Don't be precise. I did this entire page in less than 30 seconds. Quick, quick, quick. If you over think it, you are likely to over do it :) I have to tell myself this--often!
Anytime I paint/draw, I think back to the sixth grade when Norman Bridwell came to my elementary school and drew Clifford the Big Red Dog right before my eyes. It was amazing to me how he could just make those lines turn into Clifford.
Later I would learn that everything is just a series of lines and shapes and nothing to be afraid of ;)

Once I finished the outlines, I added some accents on the inside. I made sure to curve my lines around my knots and along the logs to make my wood grain.

Again, quick like and not precise.

Ta Dah!


13 GOODe Thoughts:
Wow! I don't think that I'm brave enough for that yet, but I love it!
You can always paint over it ;) Give it a try and I bet you'll see it is easier than you think :)
You're like watching Bob Ross on the Joy of Painting (without the fro - haha)...You take a blank canvas and turn it into something wonderful! I'm not nearly creative enough for that! But it sure is cute!
What a smart girl you are! Love the fact that you use the sharpie!
Have a great day!
That turned out fabulous. I bet your daughter loves it!
God's blessings,
Sarah :D
Lol! Terra. I do have my bad hair days though.
Thanks, Kerin! Sharpies are a girl's best friend;)
I'm impressed! I looks great!
Thanks for linking!
Andy
Poppies at Play
Cris, this is such a wonderful tutorial! I shared it with my readers today on Wonderful Wall Art.
Thanks so much for such great instructions!
Cris, this is such a wonderful tutorial! I shared it with my readers today on Wonderful Wall Art.
Thanks so much for such great instructions!
I'm impressed! I looks great!
Thanks for linking!
Andy
Poppies at Play
That turned out fabulous. I bet your daughter loves it!
God's blessings,
Sarah :D
Wow! I don't think that I'm brave enough for that yet, but I love it!
Cris, this is such a wonderful tutorial! I shared it with my readers today on Wonderful Wall Art.
Thanks so much for such great instructions!
Post a Comment